 Build Guides
 Flatline Van Co Roof Rack Installation Guide (New Version)
A step-by-step guide to installing the new version of the Flatline Van Co roof rack on a 2020 Ford Transit Mid-Roof, including faring and solar layout tips.
A professional-grade walkthrough for installing a MaxxFan Deluxe 7500K roof fan in a Ford Transit using an adapter ring and the Adventure Wagon kit.

Installing a roof fan like the MaxxFan Deluxe 7500K is one of the most important upgrades you can make for your camper van. Proper ventilation helps control moisture, reduces condensation, and improves comfort—especially for full-time van life. In this guide, we'll walk you through a professional-grade installation of a MaxxFan on a Ford Transit van using the Adventure Wagon kit and an adapter ring.
Whether you're building out your own rig or using a conversion kit, ventilation is essential. The MaxxFan Deluxe 7500K provides:
Here are the recommended products and materials used during this install:
| Item | Purpose |
|---|---|
| Adapter Ring | Levels the roof surface over corrugations |
| 3M Window Weld / MS 5510 Adhesive | Bonds the adapter ring to the roof |
| Rust-Oleum Paint | Prevents rust on exposed metal |
| Fine-Tooth Jigsaw Blade | For cutting the fan hole |
| Denatured Alcohol | Surface prep before adhesive |
| Scotch-Brite Pad | Light sanding before sealing |
| Flex Seal (Paintable) | Final waterproof sealant layer |
| Stainless Steel Screws + Nylock Nuts | Bolts fan securely to adapter ring |
If you're using the Adventure Wagon kit, you'll have a couple of roof cutout options. Typically, the fan is installed forward to leave space in the rear for a future A/C unit. Confirm your layout by dry-fitting the ceiling panel and using the MaxxFan trim ring as a template.
Using a small drill bit, drill a pilot hole through the marked center of the fan location. Push the bit through and leave it sticking out for alignment when you're on the roof.
Before cutting, thoroughly clean the roof to remove dust and debris. This ensures your tape and adhesives will stick properly.
Align your adapter ring using the pilot hole, trace the outline, and tape off the cutting area. Drill starter holes in each corner, then use a jigsaw with a fine-tooth blade to cut the 14″x14″ hole. Remove burrs with a flap disc, clean with denatured alcohol, and paint all bare metal edges with Rust-Oleum.
Apply three thick beads of adhesive (inner, middle, outer) to the underside of the adapter ring. Align it over the hole and clamp it flat using padded blocks and wood spacers. Let cure overnight.
Position the MaxxFan's top mounting ring over the adapter. Instead of using the included sheet metal screws, this install uses stainless steel screws with nylock nuts for a more secure and weatherproof finish.
Apply adhesive around each screw head and thread to prevent leaks. Then tighten the bolts carefully—do not overtighten to avoid cracking the fan's plastic housing.
Once the adhesive cures, scuff the surrounding plastic and apply paintable Flex Seal over the entire base. This gives a clean, professional appearance and an extra layer of waterproof protection.
Use painter's tape to create clean edges, and remove the tape before the Flex Seal dries to avoid peeling.
The MaxxFan Deluxe only requires a 12V positive and negative wire for operation. You can wire it up during the fan install or later in your build. The deluxe model includes a remote control for convenience.
A clean MaxxFan installation not only keeps your van cooler and more breathable—it also adds resale value and long-term durability. While it may seem like overkill to use Flex Seal and stainless bolts, these extra steps provide long-term peace of mind, especially in extreme weather.
If you found this MaxxFan install guide helpful, feel free to share it with a friend building out their van. Got questions? Drop them in the comments, and we'll add them to a future update or video.
Build Guides A step-by-step guide to installing the new version of the Flatline Van Co roof rack on a 2020 Ford Transit Mid-Roof, including faring and solar layout tips.
 Build Guides
 A step-by-step guide to building a fold-down Murphy bed in a medium roof Ford Transit using 8020 aluminum framing and spring-loaded hinges.
 Build Guides
 Learn how to plan a functional, safe camper van roof layout covering vent fans, solar panels, roof racks, AC units, awnings, lighting, and wiring.
 Build Guides
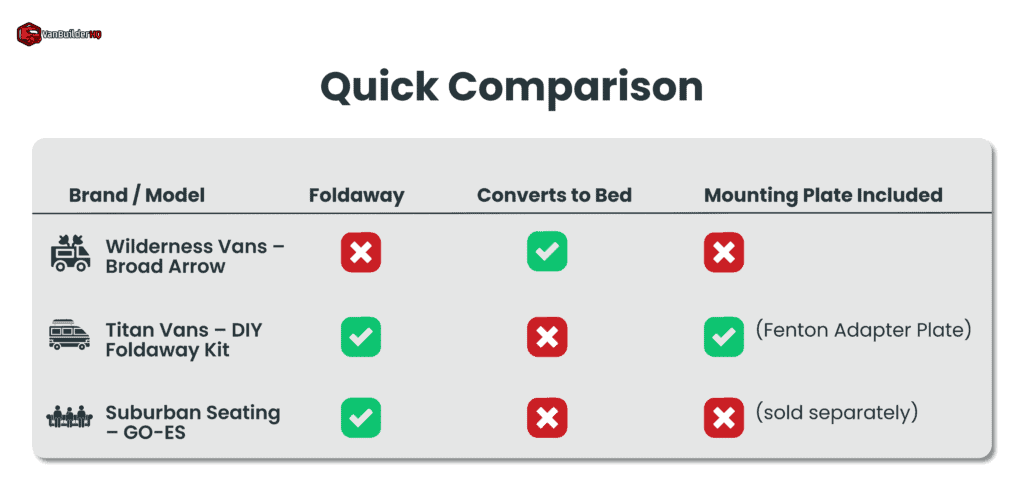
 If you're planning a DIY camper van conversion and need a safe, space-saving seating option, the Freedman flip and fold seat deserves your attention.