When you first start creating a campervan, you’re probably thinking about everything you want to include to make it your home away from home. If you’re more technically minded, you might be thinking about your water and power systems.
Alternatively, if you’re all about aesthetics, you might just be thinking about what your furniture will look like and how to arrange it all. But something that you absolutely cannot ignore during your build is your campervan flooring.
In fact, the rise of the van life movement underscores the importance of thoughtful planning. According to recent data, the number of van lifers in the United States has increased by 63% in the last couple of years, growing from 1.9 million in 2020 to 3.1 million in 2022. This boom in popularity highlights just how important it is to plan every detail of your campervan build, including the campervan floor plans. Flooring is a foundational element you can’t overlook.
In this campervan flooring guide, we’ll walk you through all the essential steps for DIY campervan flooring installation. Whether you’re after durability, comfort, or style, we’ve got you covered.
And remember, if you’re looking for even more guides and walkthroughs for your campervan build, Van Builder HQ is always here to help!
How to Plan Your Campervan Floor the Right Way
It’s easy to assume that you can just pop in some flooring material and call it a day, but the truth is that a good campervan floor or Class B RV flooring build requires a fair amount of prep work. In theory, you could just order the materials and do everything on the fly, but chances are you’d end up wasting a lot of time and money. You’ll almost definitely have to come back a few days, weeks, or even months later to fix issues that would not have come up if you had just created a campervan floor plan from the start.
Here’s how you can plan your campervan floor effectively:
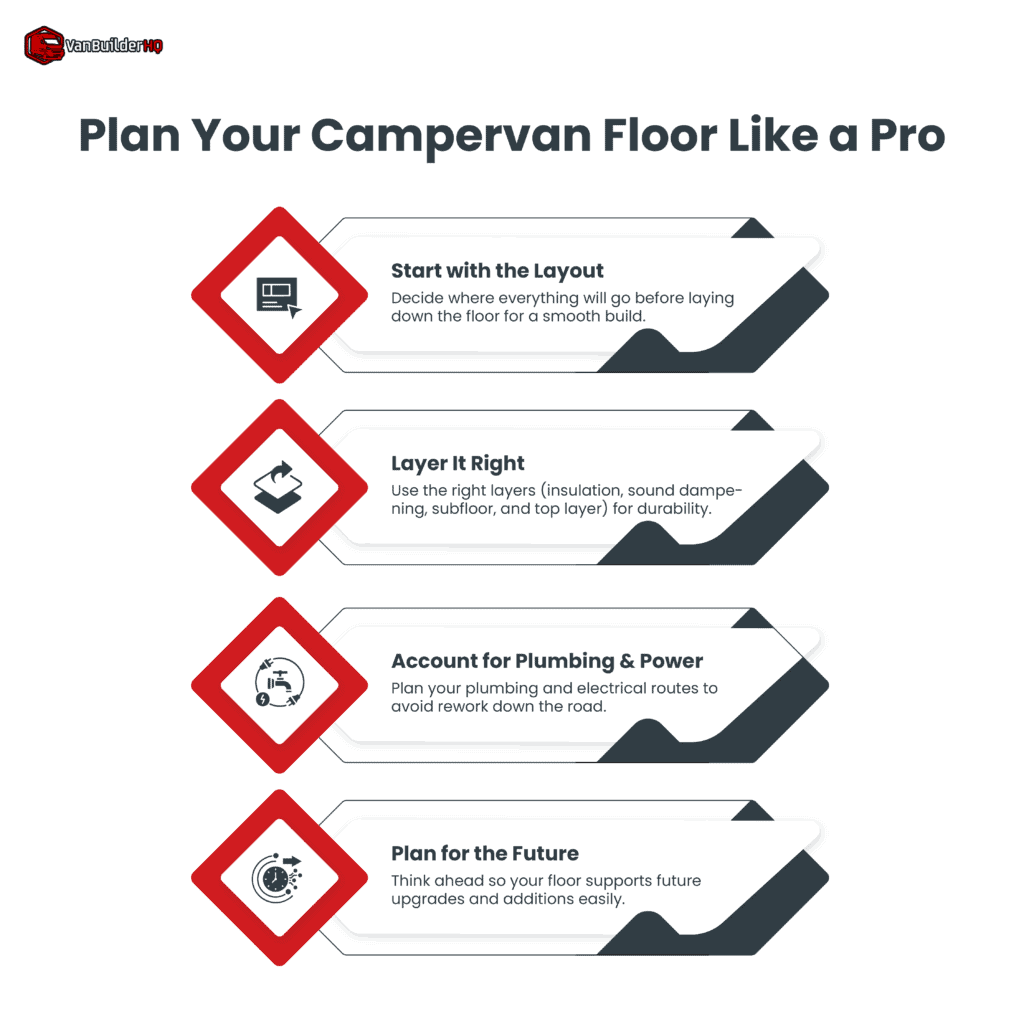
1. Start with the Layout: When devising a plan for your campervan floor installation, you’ll want to first think about your floor plan layout. Map out the entire campervan floor plan ahead of time to understand where everything will go. This includes larger, fixed objects like your bed, kitchen galley, and any storage solutions. Don’t forget about the placement of power and plumbing systems, as their routes will affect the floor of your campervan.
2. Why a Floor Plan Matters: Believe it or not, the layout of your campervan floor plan will impact every choice you make in terms of flooring. For example, if you’re planning to include a campervan floor with a bathroom, this will require extra consideration for waterproofing, insulation, and durability.
3. Plan for Future Additions: With some builds, you might start with the floor and then add other elements on top as you go along. While this is a popular method, we recommend planning where each item will go in advance. This ensures that you don’t run into issues down the road. Planning ahead allows you to create a cleaner, more cohesive floor design that doesn’t require unnecessary adjustments later.
4. Understand the Material Layers: Once you have your campervan floor plan mapped out, think about the four materials you’ll use for your campervan flooring. These materials will make up the different layers in your floor, including:
- Sound dampening: Reduces road noise.
- Insulation: Keeps your van comfortable year-round.
- Subflooring: Provides strength and structure.
- Top layer: The visible surface, which can be wood, vinyl, or cork.
Each layer contributes to comfort, durability, insulation, and aesthetic appeal. Don’t forget to balance aesthetics with practicality, as better-looking materials often come at a higher cost.
4 Critical Campervan Flooring Layers (Explained)
Like an onion, your campervan flooring (or Class B RV flooring) is going to be made up of layers. Each layer has a job to do, so it’s important to carefully consider what you can do to get the most out of each one.

Layer 1 – Sound Dampening (Using Kilmat or Dynamat)
While sound-dampening floor materials are not a requirement, they can greatly improve your overall campervan experience. Two good companies that offer materials to help reduce road noise in vans are Kilmat and Dynamat. You can get these materials through various providers, but in most cases, the materials will have a sticky side that can adhere to the bottom floor of your campervan (or your van walls if you want to use them there).

This serves as the first layer of your campervan flooring. The properties of the material change the resonant frequency of the sheet metal floor in the van, lowering the naturally high-pitched, tinny sound to a lower-frequency “thud.” It also provides a little bit of extra insulation (more on that later).
This material comes in all kinds of different weights, with heavier weights offering greater sound reduction. 50 mil is a good weight for campervans, though it is pretty thin. The reason 50 mil works well is because it is easier to cut and it doesn’t add unnecessary height to your flooring. If you opt for an Adventure Wagon kit, you get sound-deadening material right out of the box, without having to buy the material separately.
In terms of quantity, you’ll want to make sure you get about 50 square feet to do the entire van floor. If you want to add sound dampening to your van walls, you’ll probably want to get at least 100 square feet. It’s also recommended to get a rubber roller, which will help you adequately adhere the material to the sheet metal without any bumps or uneven sections.
Layer 2 – Campervan Floor Insulation
Even a single layer of campervan floor insulation can add a lot of extra comfort to your campervan. This material will go on top of your sound-dampening material, making it the second layer of your campervan flooring. It will also help with sound reduction, but its primary function will be maintaining a more comfortable temperature inside the van, regardless of the time of year.
If you’re waking up in your campervan in a cold environment, the last thing you want your feet to touch is cold sheet metal. A layer of insulation puts extra space between you and the cold metal exterior, while also preventing extreme weather from penetrating the interior of the van (to a certain degree). The technical term for this process is “decoupling,” because you are adding a barrier that stops the floor material from absorbing cold or hot temperatures.
A good example of insulation material for campervans is the one-inch FOAMULAR 150 from Owens Corning. This insulation helps provide that extra layer of protection and comfort, ensuring that your van stays warm in winter and cool in summer.

Layer 3 – Choosing the Right Campervan Subfloor
The third layer in your campervan flooring is known as the subfloor. This is generally the strongest part of the floor and helps give your floor the durability it needs to withstand heavy objects. It also serves as the part that you will use to mount various objects or pieces of furniture, as you can easily drill into it. A good campervan subfloor will typically be about a half-inch thick, but you could also go up to three-quarters of an inch.

However, you should be wary of getting something that’s too thick, as it could be heavy and cumbersome to install. Your subfloor layer will typically be made of wood, so trying to maneuver a thicker piece of subfloor wood around your van during the installation could get tricky. In any case, your subfloor will go directly on top of your insulation and will be the primary support for your top layer.
If you’re looking for the best subfloor for campervans, Baltic Birchwood is a great option. It’s a type of plywood with many layers, making it stronger and more durable. Standard Baltic Birch plywood is typically about nine-ply, which is strong without being overly thick.
When you’re ready to install your subfloor, you’ll have to do it in sections. Just be careful not to leave any big gaps. You can either make your own template to cut the subfloor into the correct size and shape, or you can buy a premade template from companies like AVC Rig. The offerings vary based on how much you’re willing to spend, but if you want something budget-friendly, AVC Rig offers a paper cutout that you can lay over your subfloor to trace and then cut out.

Layer 4 – Top Flooring Materials: Vinyl, Laminate & More
The top layer is the fourth and final layer of your campervan flooring, and it is the part that you’re actually going to see. Whether you’re focused more on aesthetics or your budget, you want to make sure that your top layer can sufficiently protect your subfloor from spills. This means that it needs to be watertight. As an extra precaution and a complement to your top layer, you can even paint your subfloor with a mold inhibitor.

Keep in mind that many top layer flooring materials will need expansion gaps for temperature changes. Some materials expand and contract more than others based on the weather, so you’ll need to plan accordingly with your top layer. Some of the most common top layer materials include vinyl, laminate, and cork.
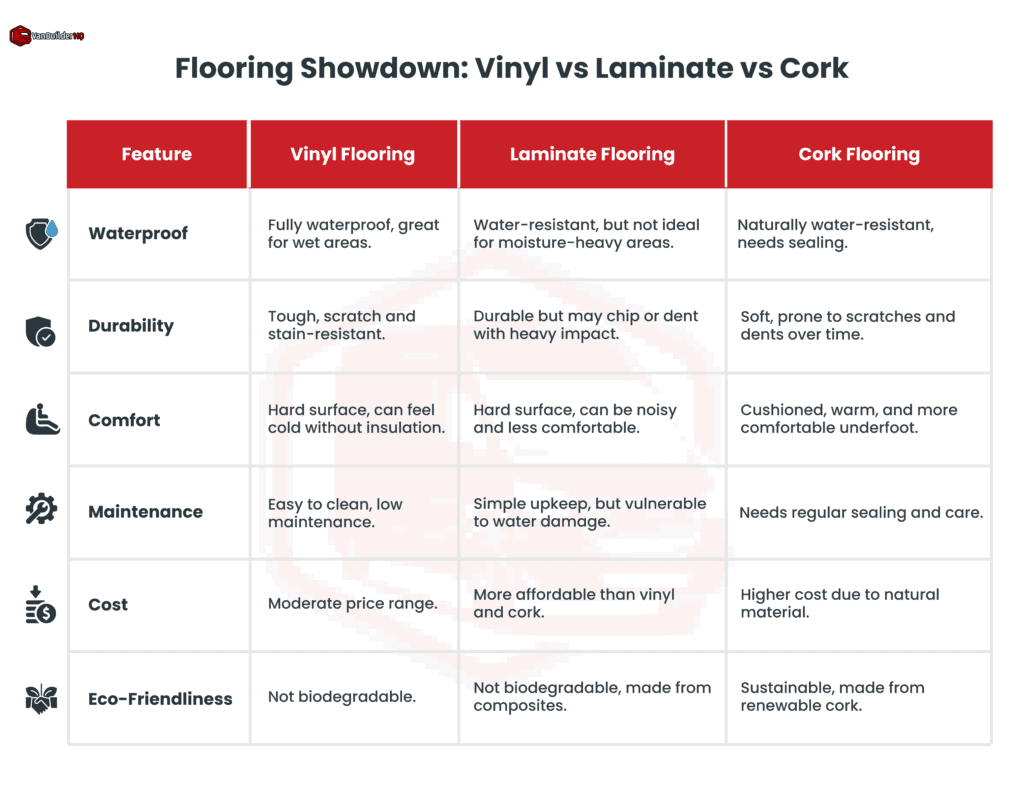
If you’re looking for campervan vinyl flooring, it offers durability, ease of cleaning, and a variety of aesthetic options. Cork flooring for campervans is another popular option due to its natural insulating properties and eco-friendly qualities. You might also want to explore other materials depending on your aesthetic preferences and budget.
Best Campervan Flooring Options (With Pros & Cons)
Choosing the right flooring is a critical part of your campervan build. Your choice will impact comfort, durability, and how easy it is to maintain. Below, we’ve compared three of the most popular campervan flooring options: Vinyl, Laminate, and Cork.
Key Considerations Before You Install Your Campervan Floor
Even once you understand how the four layers of your campervan flooring should work together, there are still a few things that you’ll want to consider and evaluate when planning for your installation:
- Insulation Factor
When you’re installing insulation, you want to make sure that you’re getting the most insulative value out of the material. This is where compressive strength comes into play. Many types of insulation can be compressed.
For example, if you use something like wool, it is going to get smooshed down by heavy objects and lose a lot of its insulative value. Plus, it’s just not going to support your campervan floor very well.
Some good alternatives are XPS (Extruded Polystyrene), which is essentially a rigid foam board. This has greater compression strength and will not collapse, as long as it has adequate support from the subfloor. When selecting campervan floor insulation, consider materials that won’t lose their effectiveness under pressure, ensuring long-term performance.
↪ Proper insulation can reduce heat loss by up to 40% in a campervan, making it a crucial step in creating a cozy, functional, and enjoyable living space.
- Durability
The durability of your campervan flooring will largely be affected by the type of insulation and subfloor you use. For example, if you use an insulation material with a PSI rating of 15, that means you can put 15 pounds of pressure on a square inch of the material, and it will hold it up. This is why you need to plan the layout of your campervan floor in advance.
If you have something that’s too heavy for your particular insulation, you’ll need to replace the foam in that section (or sections) with wood or square aluminum tubing so that the weight can be distributed evenly on the floor. If you’re considering heavier materials for your top layer, keep durability in mind to avoid any long-term issues with wear and tear.
- Height
While it can be tempting to add a lot of extra insulation or sound-dampening materials, you have to think about the height of your floor and the vertical space available in your van. The more you add, the less overhead space you’ll have. So, if you’re trying to make every inch of vertical space count, that extra inch of flooring may not be that valuable to you.
This is especially important for taller individuals or if you’re working with a compact campervan. Take this into consideration when selecting the thickness of your campervan flooring layers.
- Cleanliness and Abrasion Resistance
Cleaning your campervan flooring should be pretty straightforward. However, you’ll want to make sure to choose materials that are abrasion-resistant to reduce scratches.
Even with the best materials, sharp rocks or sand may still cause damage over time. So, it’s a good idea to consider adding a rug or floor mat, particularly in areas where you anticipate more foot traffic. Inhabit is a company that even makes custom floor covers to fit your campervan perfectly.
Campervan Floor Installation Tips (From Real Builds)
We’ve already covered many of the do’s and don’ts of a successful DIY camper flooring installation, but there are still a few tips and tricks to make sure that you do everything right the first time:
⇒ Have a Plan
This cannot be stressed enough. The more planning you do in advance, the less you’ll have to worry about spending extra time or money later on. Planning your DIY camper flooring carefully helps ensure that you won’t need to make costly adjustments down the road.
⇒ Find Your Team
Will you need any help during your installation? Do you know who is available? Can you manage the job by yourself? Answer these questions so that you can set a realistic timeframe for the installation and know exactly who will be involved.
⇒ Know Your Environment
Are you planning to install your van flooring inside or outside? Depending on where you’re working, the temperature could cause issues with the epoxy or adhesive. If you’re working outside, inclement weather could also delay your plans, so make sure to take these factors into account.
⇒ Gather Your Tools
Do you have the right tools to complete the job? You’ll need to make sure that you have the tools to properly cut various materials and adhere them together. A DIY camper flooring project requires precision, so make sure you’re fully prepared.
⇒ Don’t Rush
Trying to get your campervan floor installed quickly is one of the biggest mistakes you can make. Take your time because the flooring is likely going to be a permanent addition to your campervan. Rushing can lead to costly mistakes that you may need to pay to fix in the future.
⇒ Follow Cure Times
Different epoxy products used in flooring have “cure” times. This means that after applying the epoxy, you need to wait a set amount of time (often 24 hours) before applying any weight to it. If you try to rush the job and put weight on it before it’s ready, you could end up with permanent waves in your campervan floor.
⇒ Wear PPE
Always make sure to work safely and wear the right equipment. This generally means safety glasses, gloves, and, if necessary, a mask or breathing apparatus to ensure you’re protecting yourself while working on your DIY camper flooring project.
Maintenance Tips & Campervan Floor Mats
Once you install your campervan flooring, proper maintenance will keep it looking great and ensure long-lasting durability. Here’s how to care for your campervan floor:
- Use Custom Campervan Floor Mats: Custom campervan floor mats protect your floors from dirt, water, and damage. Brands like WeatherTech and Inhabit offer mats tailored to your van’s floor, ensuring a perfect fit. These mats help maintain the flooring campervan durability and are easy to clean.
- Keep It Clean: Regular cleaning is essential. Use a broom or vacuum with a brush attachment to remove dirt and debris. Consider removing your shoes to keep the floor cleaner and prevent scratches.
- Protect High-Traffic Areas: Areas near the door or kitchen see the most foot traffic. In these spots, add extra protection like rugs or additional mats to reduce abrasion and preserve the floor’s appearance.
- Quick Cleaning Routine: Do a quick sweep or wipe down your campervan floor once a day to prevent buildup that could lead to scratches. It doesn’t need to be deep cleaning, just a quick once-over will do.
- Avoid Harsh Chemicals: Stick to gentle cleaning solutions to avoid damaging your campervan flooring. Harsh chemicals can degrade the material, especially for vinyl or laminate surfaces.
FAQs
1. How do you insulate a campervan floor?
To insulate your campervan floor, you’ll need to choose the right material. A rigid foam board is often the best option for insulation. Once you cut it to size and place it in the van, use an expanding foam spray to fill any gaps and seal it to the walls. Keep in mind that if you use expanding foam, you might need to grind it down to create a flat, even surface.
2. How thick should your campervan floor be?
Your campervan floor will typically be between one and two inches thick, considering the combined thickness of your insulation, subfloor, and top layer. However, this can vary depending on the materials you use. Be mindful of the floor height and the vertical space available in your van when choosing your layers.
3. How thick should plywood be for a campervan subflooring?
For campervan subflooring, plywood should typically be half an inch thick. While you can opt for thicker variations, a half-inch strikes a balance between being lightweight and providing the necessary support for your campervan flooring. Thicker plywood may be harder to maneuver and install, so consider weight and installation ease when choosing the right thickness.
4. Is vinyl flooring good for campervans?
Yes, vinyl flooring is a popular choice for campervans due to its durability, ease of cleaning, and waterproof properties. It can withstand the wear and tear of everyday use and is ideal for areas exposed to moisture. Campervan vinyl flooring also offers a wide range of styles, making it a great option for both functionality and aesthetics.
5. How cold is the campervan floor in winter?
Without insulation, your campervan floor would be just as cold as the outside temperature. For example, if it’s 0 degrees outside, the floor will also be 0 degrees (and feel colder). This is why insulation is crucial. Adding multiple layers between you and the cold metal floor helps maintain a comfortable temperature inside your van, reducing heat loss and preventing cold spots.